How to get your page load time data back in Google Analytics
GA4 does not give you the same page load time data you may be used to accessing in Universal Analytics. Here’s how you can report on page load time data in GA4.
Before it had to make way for Google Analytics 4 (GA4), Universal Analytics used to provide built-in reports for tracking page speed metrics. This made it easy to monitor page load times to see if any pages on your site were letting users down by being too slow to load.
Unfortunately, Universal Analytics is no more, and GA4 doesn’t natively support tracking page speed metrics. However, with some clever configuration, you can bring page load times back into GA4. In this article, we’ll walk you through how to set this up so you can put your site’s load time data at your fingertips.
Why track page load times?
It’s crucial that website managers understand their page load times, because page speed is an important part of the user experience and impacts your SEO.
Users don’t wait around when a site is slow to load. According to Google, the probability of a user ‘bouncing’ (leaving your site) increases 32% if your load time is 3 seconds rather than 1 second. Even a one-second delay makes page views drop by 11%.
You barely have a second to make an impression before a user is likely to bounce. If your page load times are letting you down, then all the work you put into building a great-looking site with engaging content is going to go to waste.
Google knows that users want to be served websites that load extremely quickly, so page load speed is likely taken into account by Google when deciding how to rank search results, with faster-loading sites more likely to appear first.
You can’t manage what you can’t measure, so tracking page load times is essential to help you identify and address any issues.
In the rest of this article, we’ll take you through how to track page load times using Google Tag Manager and integrate this with GA4. You’ll need to be familiar with Google Tag Manager to follow this, but if you’d like help from our team just skip to the end of the article, as we can do this set-up for you.
Step one: create custom variables.
The first step is to create custom variables in Google Tag Manager. To follow these instructions, you’ll need to be logged into your Google Tag Manager account.
- Open Google Tag Manager and go to ‘Variables’.
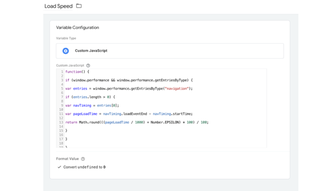
- Create a ‘New variable’ and shoose 'Custom JavaScript'.
- Insert the JavaScript code - copy it as it appears after these steps.
- For the ‘Format Value’, you’ll need ‘Convert undefined to 0’.
- Now you can name and save the Variable.
The code to copy:
function() {
if (window.performance && window.performance.getEntriesByType) {
var entries = window.performance.getEntriesByType("navigation");
if (entries.length > 0) {
var navTiming = entries[0];
var pageLoadTime = navTiming.loadEventEnd - navTiming.startTime;
return Math.round(((pageLoadTime / 1000) + Number.EPSILON) * 100) / 100;
}
}
}
Step 2: create triggers
Now you’ll need to set up your triggers. To do this:
- Go to ‘Triggers’ in Google Tag Manager.
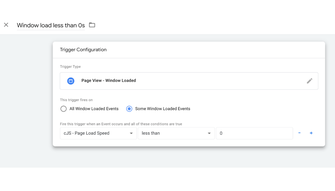
- Create a ‘New trigger’ and choose 'Window Loaded'.
- Set some conditions: For the first trigger, choose ‘All windows loaded events’. Create another trigger with a page load time less than 0 to prevent the tag from firing if the variable returns 0.
Step 3: create a GA4 event tag
Next, set up the event tag:
- Go to ‘Tags’ in Google Tag Manager.
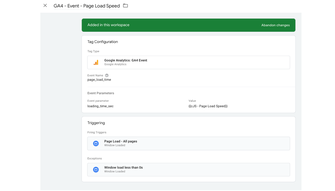
- Create a ‘New tag’ and choose ‘GA4 Event’.
- Set the Event Name to: 'page_load_time'.
- Add event parameters and make sure to include your created variable.
- Add triggers: Include 'Page load' and exclude 'Window load time less than 0'.
- Save and debug: Preview and test your setup to ensure it works correctly.
Displaying page load time in ga4 reports
Now you need to set up a report in GA4 to display this information. To do this:
- Create custom metrics in GA4: Navigate to Admin > Custom Definitions > Create Custom Metrics.
- Set metric details: Name it 'Page Load Time', choose 'loading_time_sec' as the parameter, and set the unit to seconds.
- Use in reports: Add this metric to your exploration reports or build detailed reports in Looker Studio for more in-depth analysis.
By following these steps, you can effectively track and optimise page load times, improving both user experience and your website’s search engine rankings.
Need assistance?
We understand that this process may seem quite advanced. We can set this all up for you directly if you don’t have the skills in-house. Book a call with Harry Lote our performance analyst to discuss us setting this up for you.
For a broader review and set-up of your analytics, consider our Digital Analytics service, which will get your website’s tracking configured around your most crucial digital KPIs.